
You've made your soy wax candles, but they don't look quite right. What went wrong? How do you fix it? Is it normal? Don't worry, we've got you covered. We've compiled the most common issues you might encounter making soy wax candles, and have plenty of recommendations to get you right back on track.
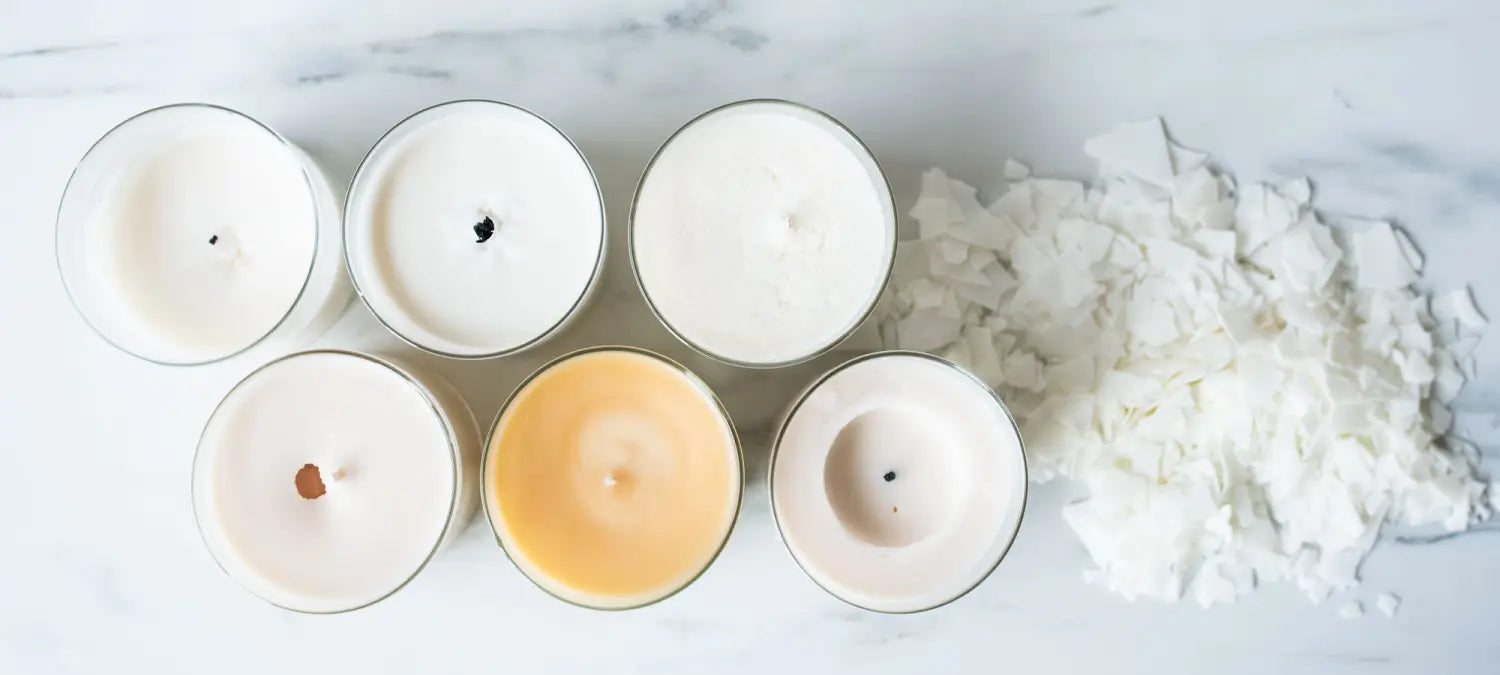
White, chalky coating (Frosting)
Frosting is a byproduct of a natural wax, and is caused by the growth of tiny crystals on the surfaces of the wax. All soy wax will frost over time, but luckily frosting is solely an aesthetic issue and does not affect the way your candle burns or smells.

Wet Spots
What can appear to be wet spots on the sides of your candles are not really wet spots, but rather places the wax has pulled away from the container as it cools. It is caused by the wax cooling faster in some areas than others. Part of the wax pulls away from the glass while the remainder adheres to the sides of the container. This is the most common glass adhesion issue for container candles. It does not affect the way your candle performs, and can be easily hidden by a label. To help avoid wet spots in your next batch try the steps outlined below:

- Clean and preheat your glass containers
It's always a good practice to wash your containers with mild, soapy water and dry thoroughly before using. As with other appearance issues, pre-heating you glassware in a warm oven to ~100°F prior to pouring will allow the wax to cool more slowly and help avoid pull away.
- Pour the wax slowly into the containers
Pouring the wax slowly into your containers minimizes the chances of additional air getting added to your wax and impeding an even rate of cooling. It's also helpful to tap the sides of your containers gently right after you've poured the wax to release any air bubbles.
- Space candles out to help them cool slowly and evenly
While cooling your candles, space them about 4" or more apart. Glass containers placed right next to each other will hold heat on the adjacent sides. This causes those sides to cool more slowly than the rest of the jar. Allowing enough airflow around your candles as they cool will encourage an even rate of cooling. You can also set your candles on a wire cooling rack rather than on a counter or table top. Solid surfaces, particularly granite and marble, will pull the heat from the bottom of the jar and can cause the wax to cool too quickly so that it shrinks and pulls away from the glass.
-----------------------------------------------------------------------------------------
Rough Tops
It can be frustrating to see a rough, unattractive surface on your cooled candles. The good news is: you aren't alone! Rough and uneven tops are an incredibly common occurrence when working with soy wax. As your poured candles cool, the wax naturally begins forming solid crystals. Ideally, these crystals are nice and uniform, giving the wax that smooth, creamy appearance soy is known for. But if the wax cools too quickly, too slowly, or contains small air bubbles, the surface of the wax will have a very mottled or pitted finish. Don't stress! There are several steps you can take to prevent and remedy these imperfections:

- Avoid over-stirring
Vigorous stirring can produce air bubbles in your melted soy wax that can lead to imperfections in the finished candles. If you notice air bubbles, tap the container gently right after pouring to help any air bubbles escape to the top.
- Adjust your pour temperature
It may take some testing to find the perfect pour temperature for your workspace, so begin by adjusting your pour temperature by +/- 5°. Finding the right temperature helps your candles cool more evenly, reducing the likelihood of imperfections.
- Cover the imperfection with a layer of wax
When pouring your candles, especially if you're just starting out or commonly experience rough tops, it's always a good idea to keep some of your wax to re-melt and cover imperfections in your cooled candles. We recommend re-pouring about 1/8th of an inch of melted wax on the top surface of the candle to cover surface imperfections.
- Re-melt the surface with a heat gun
Minor imperfections can easily be fixed with a standard heat gun found at any hardware store. Turn the heat gun on low and hold it fairly close to the container where there is a flaw you'd like to correct. Allow the wax to melt slightly which will often fix any imperfections on the surface.
-----------------------------------------------------------------------------------------
Cracking
Finding a very thin crack in a circle about 1" from the wick is common. This is caused by the combination of the wax shrinking slightly as it cools and tiny air bubbles stuck in the bottom of the container. After the wax hardens, it sinks a bit where the air bubble left a void. Most people will not notice this and it does not affect the burn of the candle.

- Gently tap the container
When you gently tap the container on your work surface, it will help release any air bubbles that became trapped in the wax. Make sure to be gentle—you don't want to shatter your glassware!
- Elevate your container
Elevate your candles while they cool by placing them on a wire cooling rack. Solid surfaces can pull the heat from the bottom of the candle, causing it to cool too quickly. Increased air flow below the candle will help with more even cooling.
- Adjust your pour temperature
It may take some testing to find the perfect pour temperature for your workspace, so begin by adjusting your pour temperature by +/- 5°. Finding the right temperature helps your candles cool more evenly, reducing the likelihood of imperfections.
- Pour additional hot wax
Remelt leftover wax, or wax you set aside just for this purpose, back to your pouring temperature. Pour slowly over the top of your candle with enough of a layer to fill the holes and create a smooth top, about 1/8th of an inch. Poke the sink hole with a skewer a few times to release any trapped air bubbles. If you do not have leftover wax you can use a heat gun to melt the surface and fill the holes. This make take 1-2 passes to completely smooth out the surface.
-----------------------------------------------------------------------------------------
Rough, Pitted Tops After Burning
The rough, bumpy tops after burning a soy wax candle are caused when the hot wax in the melt pool cools and solidifies at an inconsistent rate. This is a feature of soy wax, and not a sign you did anything incorrectly.

In fact, you can even use this feature as a way to show the candle is made with an all-natural soy wax. It does not affect the performance of the candle.
-----------------------------------------------------------------------------------------
Fragrance Leaching
In the days after your candle has cooled, you may sometimes notice that there is a significant amount of liquid on the surface of your candle, as well as a very strong fragrance. This is what we refer to as fragrance leaching, seeping, or bleeding. Typically, seeping is caused by adding too much fragrance oil or by adding the fragrance at a temperature that is too cool. Appropriate temperatures and fragrance loads ensure the fragrance binds completely with the wax. If the fragrance does not bind properly, the fragrance will start to separate from the wax and rise to the surface of the candle or in some cases, settle to the bottom of the candle.

- Mix fragrance oil in at 185°F
Think of 185°F as the "Goldilocks Zone" of temperatures. It is hot enough that any fragrance oil you use will fully bind with the wax, but not so hot that any fragrance oil might be lost to the heat. Adding your fragrance at 185°F is particularly important if the fragrance oil is especially thick and viscous, as these fragrances require enough heat to disperse through and bind with the wax.
- Stir gently for 2 minutes
Two minutes might seem like a long time to stir, but it is important to make sure the fragrance oil has had enough time to bind to the wax. Stir continuously and gently to encourage the oil to incorporate fully.
It's also a good practice to give your fragrances wax a quick, but gentle, stir before you pour into your containers.
- Adjust your fragrance load
More fragrance oil does not necessarily result in a stronger scent, and can even have the opposite effect. All waxes have a maximum fragrance load, and it is very rare that using the maximum fragrance load is necessary. The vast majority of high quality fragrance oils will be quite strong at 6-8%, and we do not recommend using more than 10% fragrance—even if your wax states it can hold more.
-----------------------------------------------------------------------------------------
Sooting and Large Flames
While you’re burning a candle you may notice some smoke coming from the flame. This is normal. Anything that burns will produce smoke, but a well-made candle will not produce excess visible smoke. If you see a large amount of smoke coming from the flame, that can be a sign you need to adjust your process and/or supplies.

- Check your wick size and series
While some smoke is expected, excess smoke is a sign you might be using the wrong wick size. If you see a thick, constant stream of smoke coming from the flame, large puffs of smoke, smoke that streams up from the wick continuously, or your container is collecting a dark film around the rim of your container, these are all signs that you need to size down on your wick. Be sure to double check that you are also using a wick in the recommended series as well. Check out our Wick Guide to get the best starting recommendations for your wax and container.
- Decrease fragrance load
If your fragrance load is too high, the flame can burn off the excess oil that was not able to bind with the wax, creating heavier-than-usual, dark smoke. The maximum fragrance load is rarely needed. Most fragrances will be plenty strong at 6-8%, but no more than 10% should be used even if your wax states it can hold more.
- Try another wick series
If you have tried sizing up and down a size in your wick series and are still having issues, try changing your wick series.
-----------------------------------------------------------------------------------------
Tunneling
Tunneling occurs when a candle wick consumes too much fuel (wax+fragrance) too quickly. Instead of a slowly forming, wide melt pool that extends to the edges of a container, a narrow melt pool forms in the center and burns down quickly, leaving a large amount of wax on the sides of the container.

- Increase your wick size
If the wick is too small it cannot efficiently burn off all of the fuel (wax+fragrance) and generate enough heat to form a good melt pool. Try increasing your wick by one size in the same series.
- Decrease your wick size
If the wick is too large, the wick will consume too much fuel too quickly, causing it to generate too much heat and melt right down the middle of your candle. This is a less common occurrence and often a harder form of tunneling to recognize. If you have tried going up a wick size and the melt pool size gets smaller, try sizing down instead.
-----------------------------------------------------------------------------------------
Mushrooming
The "mushroom" shape sometimes seen at the end of a candle wick after burning is the result of carbon buildup. This happens when the flame consumes more fuel (wax + fragrance + dye) than it can burn. It's a common occurrence, but there are a few things you can do to help manage it:

- Use less fragrance and/or dye
Using less fragrance and dye helps ensure that the flame of your candle properly consumes all the material flowing up through the wick. Remember, you don't necessarily need to use the maximum fragrance oil load to achieve a strong scent throw—and that doing so may even have the opposite effect and hinder your throw rather than boost it.
- Trim wick between burning
Some wick series are more prone to mushrooming than others. Be sure to trim your wick to 1/4" each time you burn the candle.
- Size down your wick
If you have a very deep melt pool soon into your burn time, more than ½" in 30 minutes, and see excess smoke or soot build up on the container, try going down a size in the same wick series.
-----------------------------------------------------------------------------------------
Mixing Issues
When the wax is not at a hot enough temperature, the fragrance may not go into solution and some of it may settle to the bottom of your pouring pitcher or candle. This can cause a poor or inconsistent scent throw. When the wax is at the optimal temperature of 185ºF, the fragrance will be evenly dispersed throughout the wax, ensuring a consistent cold and hot throw.

- Mix fragrance oil at 185°F
Adding fragrance oil at 185°F ensures that the oil properly binds to the wax. Lower temperatures do not create an ideal solution and can prevent the oil from fully incorporating with the wax, leaving it to settle to the bottom.
- Stir gently for 2 minutes
Stirring for two minutes might seem like a long time, but it is important to make sure the fragrance oil has had enough time to bind with the wax. Stir continuously and gently to make sure the oil is fully incorporated. Giving your wax an additional stir before pouring also helps make sure the fragrance is fully and evenly distributed.
- Check your fragrance load
Fragrance loads max out at different percentages depending on the wax. For example, in wax the maximum recommended fragrance load is 10%. Exceeding this load can cause mixing issues, preventing the fragrance oil to fully bind to the wax.
-----------------------------------------------------------------------------------------
Clumpy, Wet Wax
Soy wax is a natural product, and may vary slightly from batch to batch. Sometimes you will get oily flakes that clump together and sometimes they will be very dry and crisp. When the wax is clumpy or oily it is usually due to the outside temperature or higher oil content in the wax. This is nothing to be alarmed about and you should follow regular soy candle making procedures.

- Heat wax to 185°F
If the clumping you see in your wax is due to excess moisture or humidity, heating your wax to 185ºF - 200ºF and holding it there for about 5-10 minutes will help it evaporate out.
- Don't worry
Clumpy wax happens from time to time and the longer you work with soy wax, the more familiar you'll become with this issue.
-----------------------------------------------------------------------------------------
Air Bubbles in Wax
During manufacturing, the soybean oil that eventually becomes soy wax is constantly stirred and agitated, which allows air into the oil. Occasionally, some of that air gets trapped in the wax during the flaking process, and is released when the wax is melted down for candle making. If your wax contains excess air, you might see a slightly foamy look on the surface while the wax comes to temperature, visible bubbles rolling to the surface as the wax is heated, or audible popping sounds, similar to frying food. You will probably not notice the air bubbles most of the time, but it can sound alarming to hear the popping noises while the wax melts.

- Allow air bubbles to release
Slowly stir the wax to help release any trapped air. Continue until the popping noise stops and there are no visible bubbles.
- Be gentle with stirring
Stirring the wax too briskly will create air bubbles. Stir slowly to avoid adding any extra air.
- Slowly heat wax to 190-200°F
If you hear a lot of popping, heat the wax to 190-200°F to help release the trapped air.
-----------------------------------------------------------------------------------------
Cloudy Wax
During the manufacturing process, the soybean oil is being constantly stirred which allows air into the oil. As the wax undergoes flaking, condensation from that process may soak into the flakes in small amounts. When you melt your soy wax, it will typically become clear as all the flakes melt, but on occasion you may notice the wax looks very cloudy, similar to how it looks as it cools and sets up after pouring. This is caused by either air or water becoming trapped in the wax during the manufacturing process.

- Allow wax to stay between 185-200°F
Holding the wax temperature between 185-200°F will allow any trapped moisture to evaporate.
- Give the wax time to air out
If the cloudy wax is caused by trapped moisture, keep the bag open and unsealed to allow moisture to evaporate.
- Store wax in a cool, dry location
Storing wax in a cool, dry area will allow excess moisture to evaporate and ensure that more moisture is not collecting in your bag.
-----------------------------------------------------------------------------------------
Wax Discoloring
Whether you add color to your candles or leave them dye-free, they will be affected by natural and/or artificial light at some point. Like the way sunlight will turn white fabrics yellow or cause bright colors to fade, dye-free candles will start to yellow and dyed wax will eventually fade. Fragrances with a high vanillin content and many citrus scents can cause the wax to develop a yellow tint within 24 hours. Fragrances with small amounts of vanillin and floral scents can cause a gradual yellowing over time.

- Use a UV inhibitor
Sunlight will cause dyed candles to fade. A UV inhibitor acts like a sunscreen for your candle, blocking the UV light to prevent fading and yellowing. It is important to note that a candle yellowing due to the vanillin content in the fragrance oil is a separate issue and will not be prevented by the UV inhibitor.
- Add a small amount of ivory dye
If your candle is yellowing due to vanillin in the fragrance oil, use a small amount of ivory dye to help counteract the yellow tint to give you a more natural, uniform soy color.
- Minimize your use of vanillin containing fragrances
Vanillin is known to cause discoloration in wax. If you are finding that the UV inhibitor or ivory dyes aren't working to your liking, or if you don't like adding them to your workflow, consider minimizing your use of fragrance oils containing vanillin.
-----------------------------------------------------------------------------------------
Wick Is Off-Center
Proper wick placement is essential for a safe, well-burning candle. If the wick is placed too far to one side or the wick leans, you may end up with a candle that burns on one side only. In some extreme cases, the wick can get too close to the side of the jar and overheat the glass, causing it to shatter.

- Use a wick setter tool
Using a wick setter in your container is an easy way to make sure your wick is placed in the center of your jar. These can also be used easily wick candles with multiple wicks, and will ensure that the spacing between wicks is even.
- Create your own guide
If you don't have a wick setter, you can create your own wick placement guide. For clear containers, your guide can sit under the jar. For non-clear containers, use a thicker piece of paper like card stock or cardboard to make handling easier. Trace your container on a piece of paper and find the center by drawing a vertical line and a horizontal line down the middle. Place your wick over the center point on your guide and trace the tab. For clear containers, put your new custom placement guide under the jar and use it to place the wick into the center of the jar. For non-clear containers, follow the same process as above. After you've traced the outline of the tab, use a skewer to poke a hole in the center large enough to fit the wick through. Thread the wick through the hole from the bottom up so that the wick tab is at the bottom beneath your placement guide. Place the wick and guide down into the container and press wick down. Carefully remove the guide.
- Keep wick held taut
When you set your wick, be sure to pull it taut. If it is too loose, it can cause the wick to bend and shift away from the center as the candle sets.
-----------------------------------------------------------------------------------------
Sink Holes
Air can become trapped in soy wax during the manufacturing process. When you melt your wax at home, you may occasionally spot or hear some of that air escaping. Sometimes this trapped air ends up in your poured candle. While the wax cools and sets, the air works its way to the top and is released. However, if the surface of the candle sets before all of the air has time to release, it will get trapped in the candle. As the wax sets up, the air pocket leaves a void in the candle, and the surface above the void will collapse. Sometimes these sinkholes can be very small and sometimes they can be up to an inch deep into the candle.

- Pour additional melted wax
Reheat leftover wax, or wax you've set aside for this purpose, back to your pouring temperature. Pour slowly over the top of your candle with enough of a layer to fill in the holes and create a smooth top. Poke the sinkhole with a skewer a few times to release any trapped air bubbles.
- Melt the surface
If you do not have leftover wax you can use a heat gun to melt the surface and fill the holes. This may take 1-2 passes to completely smooth out the surface.
- Monitor the wax
Monitor the wax as it melts to spot any visible air bubbles, and stir gently to help bring them to the surface. After you pour the wax in your candle, carefully tap the container on your work surface to release any trapped air.
-----------------------------------------------------------------------------------------
Small Melt Pools
It takes a bit of time to establish a full melt pool, approximately 1 hour per inch of container diameter. If your candle has been burning for the appropriate time for your container size and the melted wax has not reached the edge of the container, your candle is not generating the heat needed for a full melt pool.

- Increase your wick size
Small melt pools are caused when the candle is not generating enough heat. The wick is not burning at the temperature needed to create the melt pool size that indicates a well-made candle with a strong scent throw. Try sizing up a wick in the same series.
- Don't trim the wick too short
- Allow enough time for melt pool to form
A full melt pool can take some time. Burn your candle an hour per inch of your container diameter to allow the candle to have adequate time. If you have a 4 inch diameter container, this would be 4 hours of burning.

Comment
I am using soy wax from purenso for candle making. What is the ideal temperature for the wax to be poured in the containers as I’m getting very rough top and frosting as I poured at 135 farenheit.